Warping Instructions #
Warping is one of the things that takes the most labor in weaving, so make it an adventure and try to find a way to love it. I reccomend podcasts or an album you haven’t heard in a long time. Take pleasure in the repetition and funny shapes and movements your hands learn to make.
There are a million resources with information on how to warp, notably those by Chandler and Osterkamp, and this certainly won’t live up to those, but I’ve come up with a few methods and diagrams that are specific to the looms and equipment available in this class or can be improvised if you don’t have the “official” weaving equipment.
Method Overview #
There are different warping methods based on the loop you have. The most common method used with Cricket Looms, Direct Warping (shown in the video below), is the easiest and fastest but we won’t be teaching direct warping in the class, becaue I want to teach you the technique that will transfer to all looms, beyond the Cricket Loom. Nevertheless, here is the video in case you need it.
The method we’ll use is a indirect back-to-front warping technique that I learned from Chandler’s book but then adjusted based on conversations with Steven Frost and Etta Sandry. This method works on cricket looms as well as all other horizontal looms that use heddles (e.g. floor looms, jacquard lomos). In this method, we:
- wind out the warps on pegs,
- transfer the warp onto the loom,
- wind the warp onto the warp beam,
- thread the heddles,
- tie the warp to the front apron rod.
- adjust the tension
- weave!
Materials Needed #
- four pegs (see above for suggestions, I like to use Irwin clamps attached to a table)
- warp yarn to wind
- two dowels or dowel like objects (rulers, sticks, etc.) that are longer than your warp will be wide
- scissors
- tape or string for fasteining the dowels together
- a friend of second person to help tension the warp while you wind.
- sheets of scrap paper
Winding the Warp #
Winding the warp can be done on a warping board or with found materials. We’ll use Irwin clamps clamped to tables but you can also use rules sticking out of a bookshelf, or any other configuration of pegs as long as they are organized in the same configuration of A, B, C, and D below. Pegs A and B should be as far away as you would like your warp.
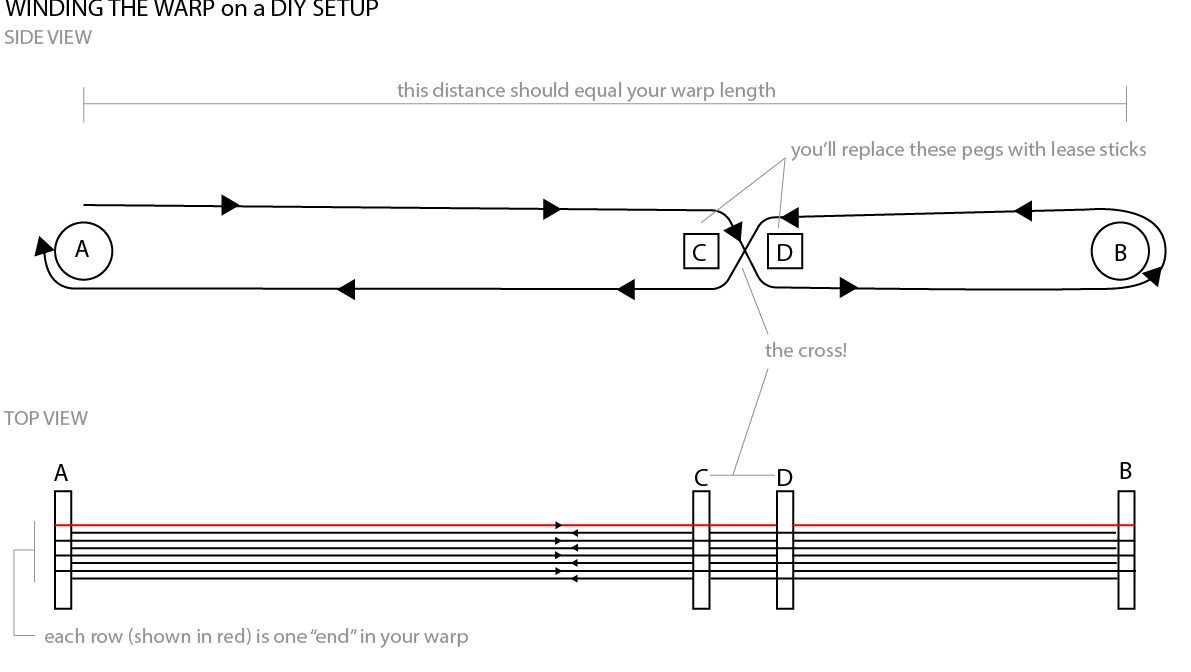
Start at peg A by knotting your warp yarn around the peg, then, just walk back and forth across the length making the figure eight that goes over A and C, under D and B, then over B and D, then under A and C, repeat. This figure 8 motion creaets a very important shpae between C and D called “the cross”. The cross will keep your warp yarns organized by ensuring that they cannot travel out of their winding order. Wind out as many lengths as you want warp ends. Change colors as you like, but always obey the cross, making sure it maintains its order. Each path from A to B (or B to A) counts as 1 end.
Tie the last warp to the peg where you are ending then “tie the cross” by inserting a string between A-C, then looping it around to pass through D-B and loosely tying it. Now you can shimmy the warp off the pegs and move it over to your loom. Insert insert two sticks or dowels into the openings on either side of your cross (one in the space between A and C, and the other in the space between D and B). These will serve as your “lease sticks” which will help you immensly in the warping process. Once you have inserted the lease sticks secure them together with string or tape, leaving a 1" gap between the sticks. Once your lease sticks are inserted and secure, you can cut the tie you created on the cross. The lease sticks have you covered now. Pro tip: keep the warp under tension as much as you can to prevent tangles. Use a “warp chain” to secture the warp if its too long to carry or you’re warping alone.
For a video showing how to tie the cross and chain the warp, see below.
Transfer the Warp to your Loom #
Once you have wound the warp, you can move it over to your loom. Slipping the loop that once formed around Peg B through the apron rod on the back side of the loom.
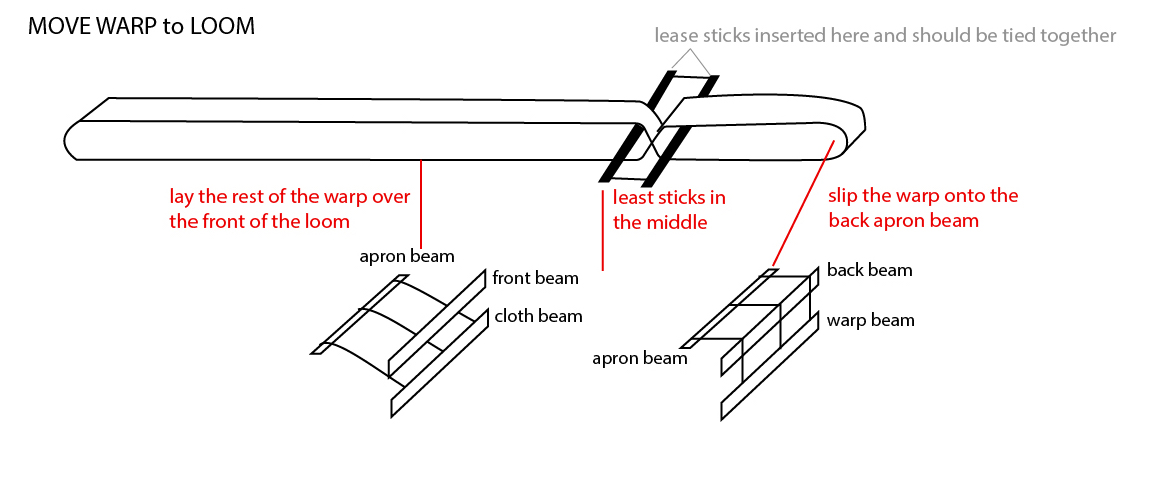
The diagram below uses an abstraction to represent your loom that shows ONLY the beams, apron rods, and apron cords so that you can more clearly see how the warp is attached to the loom. Its important that the warp will travel over the back beam before winding onto the warp beam. Make make sure your apron cords on the back of the loom travel over the warp beam! At this phase, you can remove the Cricket loom’s heddles and just lay the reamining length of the warp over and across the front of the loom. If you are on a floor loom, you an gently lay the warp over the frames or through the frames (with the heddles moved aside). Evenly distribute the warp loops on the back apron rod across the width, reattach the apron cords, and make sure you didn’t twist up your warp when you moved it. If you did, just untwist by rotating the lease sticks so your yarns follow a straight path from the apron rod to the cross/lease sticks. Place your lease sticks between where the heddles would be and the back apron rod.
When you perform this step on a cricket loom, you’ll need to make sure the apron rod is attached by the exact same length of apron cords along the beam. Refer to this video about how to create a loop in your apron cord for the apron rod to move through.
Before moving to the next step, ensure the following:
- You have added your warp to the apron bar on the back/warp end on the loom.
- Your apron cords are exactly the same length such that when you pull on the apron rod, it is not tilted in either direction.
- Your warp sits evenly and centered between the apron cord.
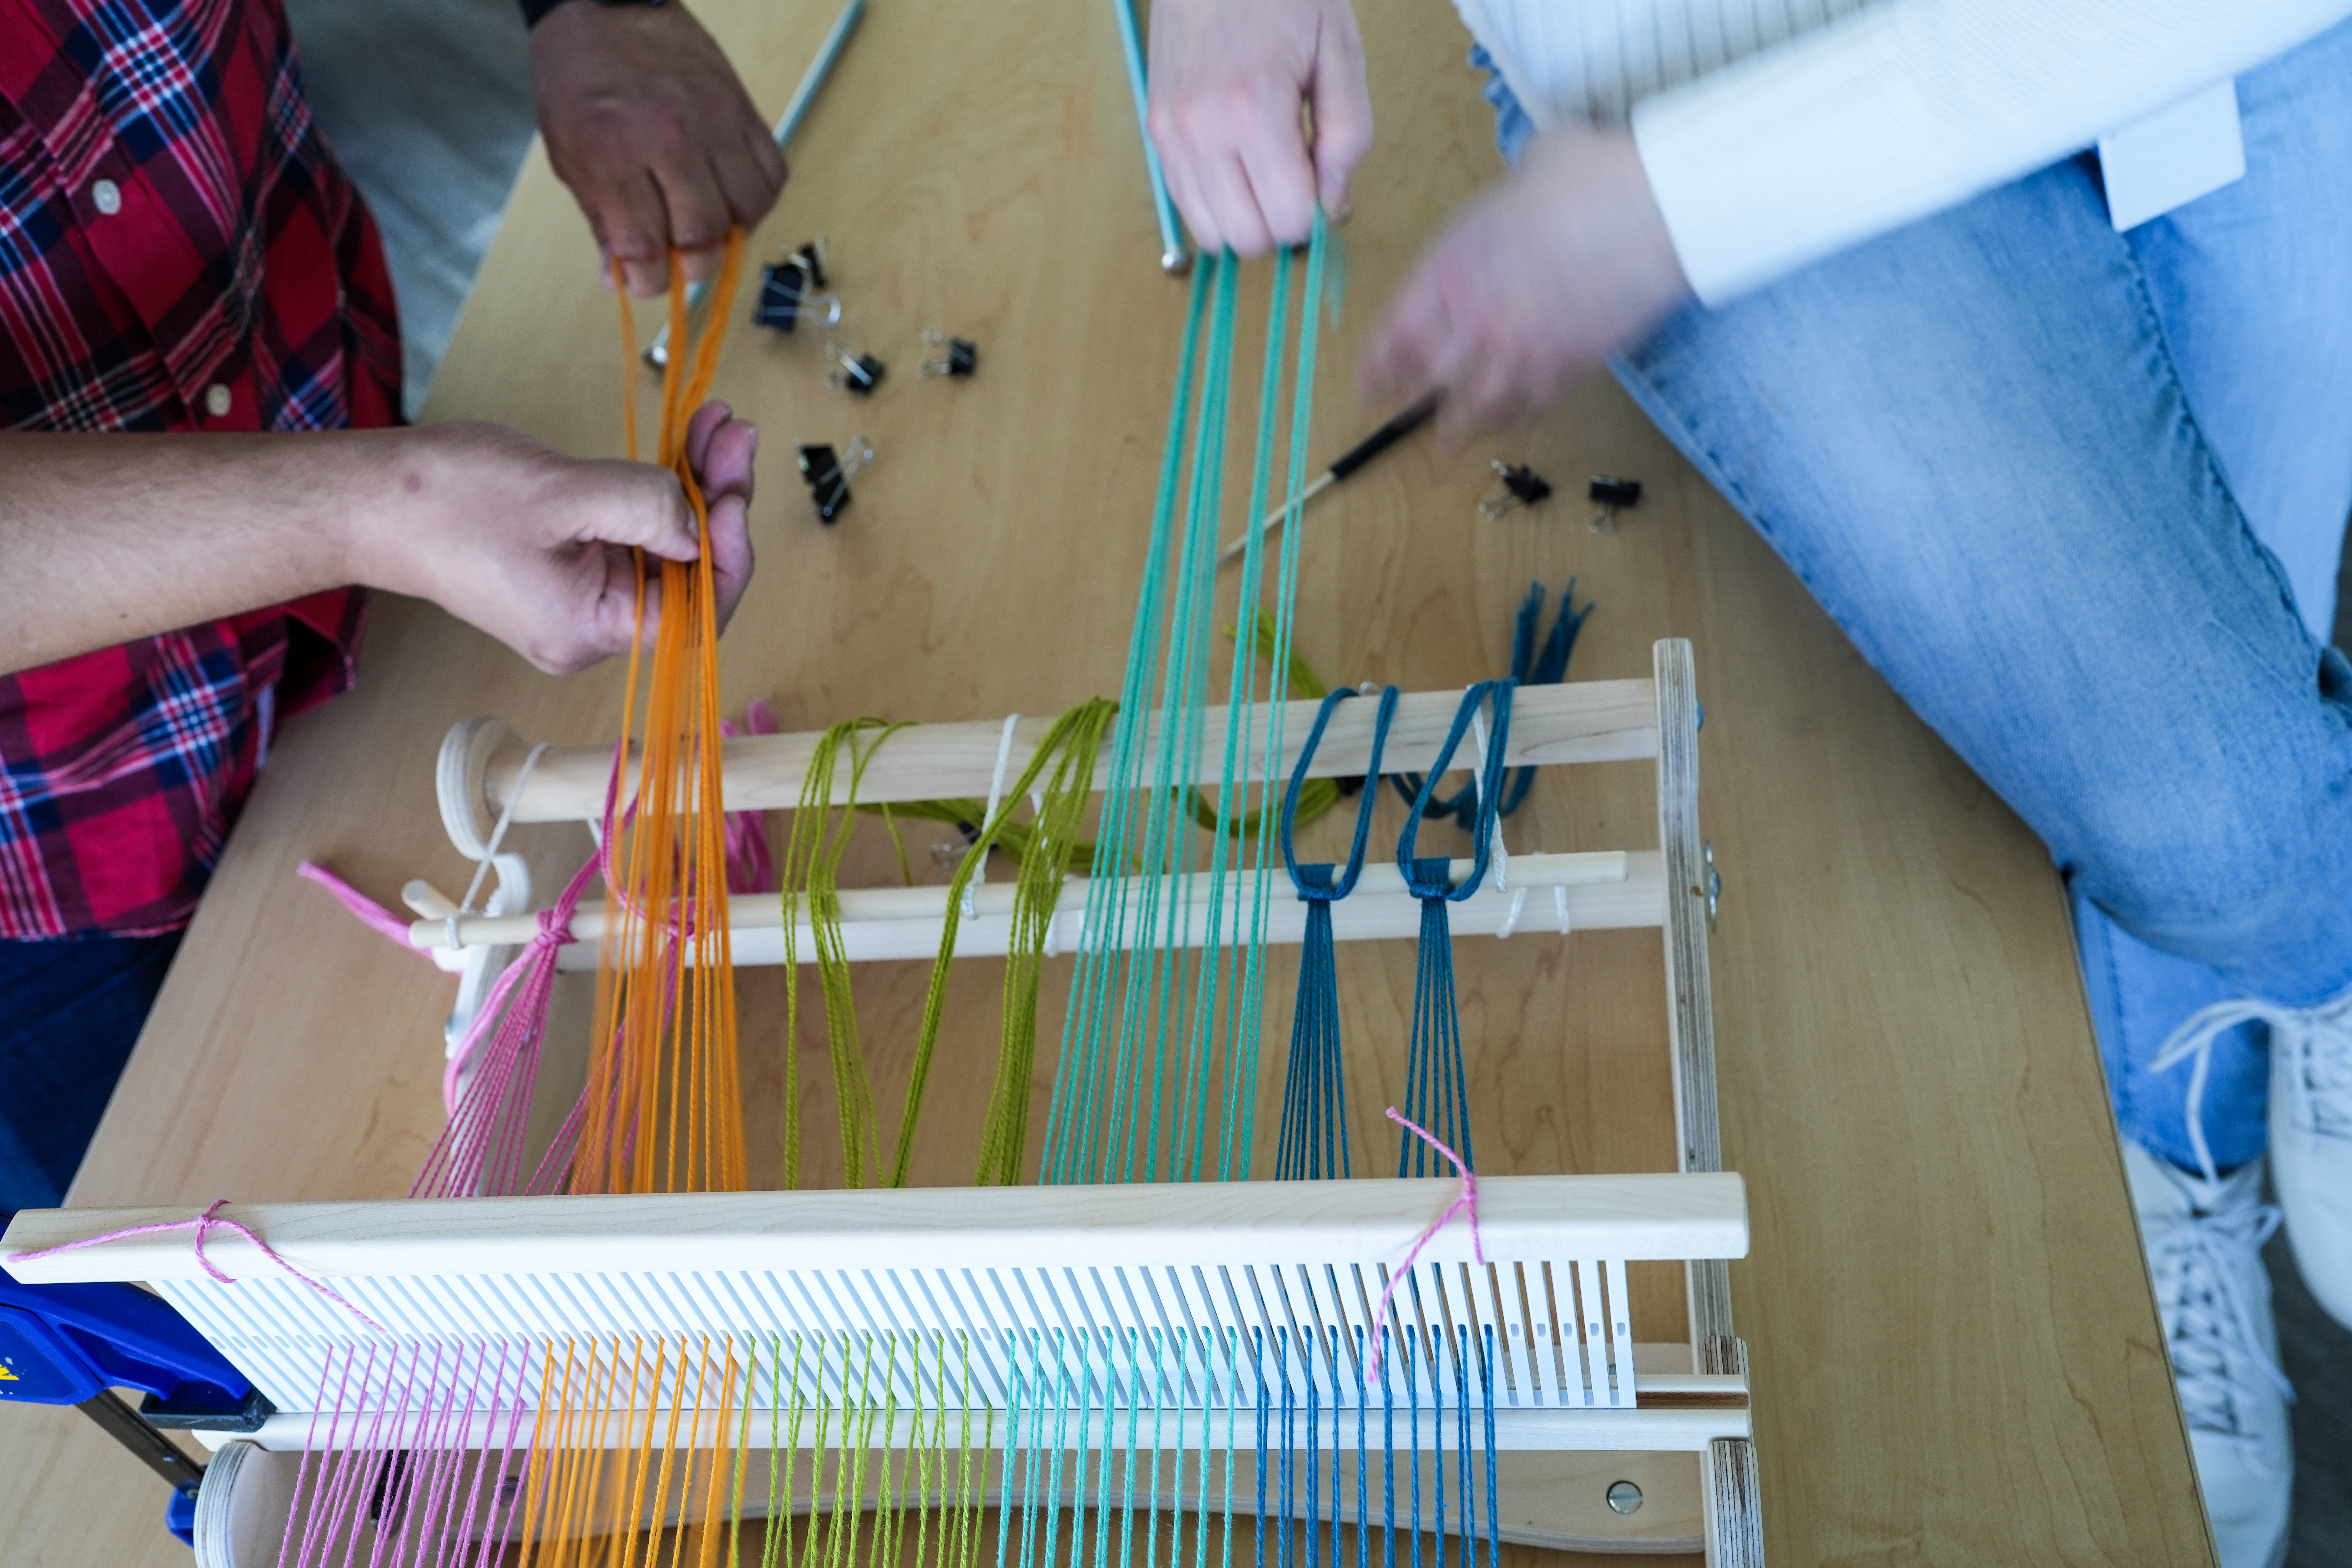
Wind the Warp onto the Warp Beam #
Find the friend or recruit a new friend to help you at this phase. Here, one person will hold the warp taut as you wind the warp beam, pulling and rolling the warp on the beam. You’ll wind a little, adjust, wind again, and so on.
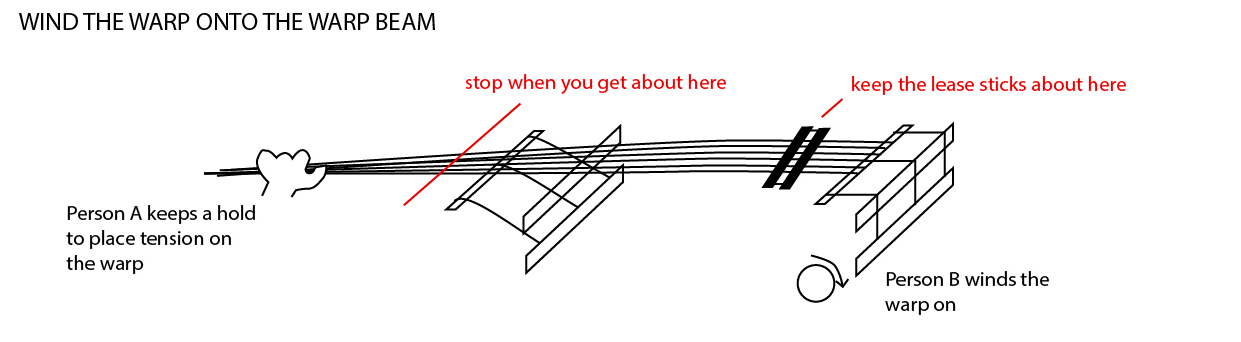
The warp beam on your loom is controlled by a ratcheting gear so that it can hold the warps taut while weaving. Make sure the arm above the ratching gear is engaged (e.g. sitting on the gear) when you wind. Make sure that you roll on the warp beam in the direction that locks the beam in place. To test, gently pull on the warp. If it rolls off the warp beam easily, you have rolled the wrong way. If it is locked, you are rolling in the correct direction.
Adjust your lease sticks as you roll so they remain in between the front and back beams. If tangles or inconsistencies appear, pause, pull front the front of the loom and try to sort things out. When lost with no hope, you can try “thwacking” the warp by pulling it up and then down hard as you would a rope at a Crossfit gym (if that’s your thing), to see if that shakes out some of the tangles. Really, its most important for the warp to look nice (evenly tight, evenly spaced) between the lease sticks and the back beam as it rolls on. This process will ensure that the warp rolls on somewhat evenly across the beam.
Each time the warp beam rolls, insert a sheet of scrap paper over the roll, to over the previous roll of warp from the next roll, presenting them from tangling. Other, more stiff materials, can work better, but scrap paper will do. When the warp ends reach just near the front of the loom you can stop winding. Hold all the ends of the warp together at the front of the loom and cut across them, so they are no longer attached to eachother. This is scary, so have your friend reassure you its all going to be okay!
Before you move on to the next step, check the following:
- the warp travels behind and over the back beam of the loom, so it sits flat between the front and back beams.
- Your lease sticks and cross are sitting near the back of the loom.
Thread the Heddles #
Begin to thread the heddles from the left to right (or vice versa, or from the middle outward), as you like, making sure that each successive warp end travels through one “heddle”. On a cricket loom, heddles take one of two shapes, an open slot or a small hole in the center of the frame. Each of these are heddles, and each should hold 1 warp end. On other looms, each heddle will look the same and you’ll thread according to your threading draft. You’ll also have to thread the read after threading the heddles, but we don’t have to worry about that in our class yet.
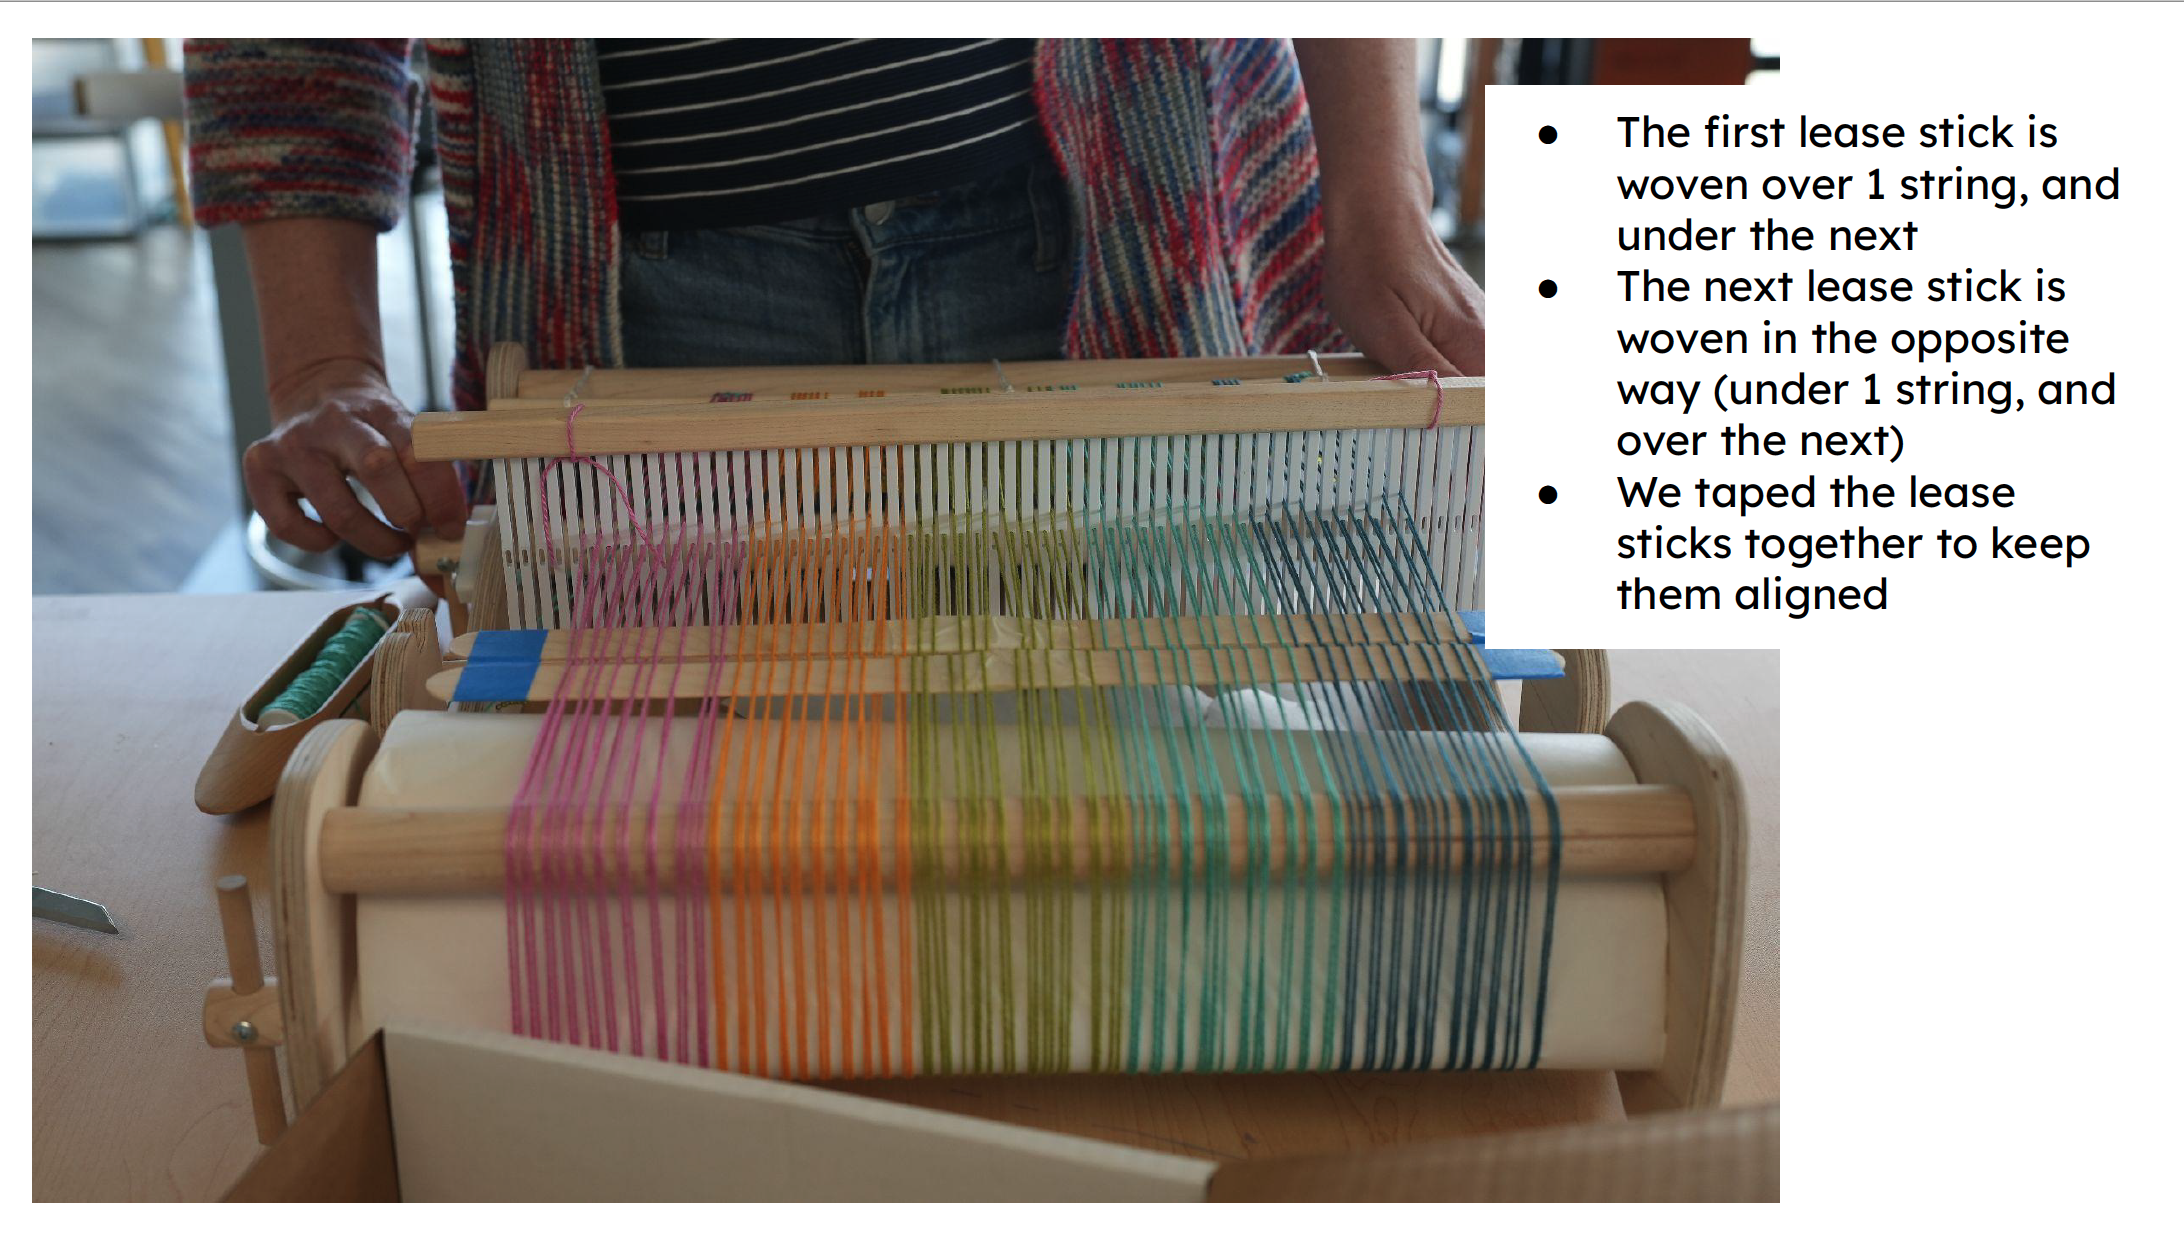
The image above shows what it should look like after you thread, from the back of the loom. You’ll see one end in each heddle and the lease sticks reamin in the warp behind the heddles and in front of the back beam.
Heddles should be threaded from the back of the loom towards the front, passing through the heddle opening without making additional loops. Once you’ve pulled about a 1" group of ends through the heddles through, you can tie them in a loose overhand knot to secure them and prevent them from pulling back through.
If you need help knowing which end is the “first” and “next” refer to your lease sticks, they enforce the order and you should use the ordering on the lease sticks as the ultimate truth for what order your warps should travel in.
If you prefer to watch a video about threading the heddle, you can do so here:
Before you move onto the next step, ensure the following:
- Make sure you didn’t skip any heddle openings.
- Tie a loose know of the warp ends in front of the heddle so you don’t loose them.
- Your warp is roughly centered.
Tie the Warp to the Front apron Rod #
Make sure your apron cords travel from the cloth beam over the front beam so that they make an unside-down L shape when the apron rod is pulled. Untie one group of your warps at a time, or untie them all and recomb things out, and then break them into groups about 1" in width. Split the group in two, loop the first and second half over the apron rod before tieing them together, above the group of warps, using a surgeons knot (look it up!) its basically a normal knot where you make two loops instead of one before tightening. This knot makes it easy to readjust the tensions in the next step. I usually like to start by tying the groups on the left and right-most sides of the loom and then the middle groups.
Adjust the Tension #
Once all your groups are tied to the apron rod, pat your open hand across the warp in front of the heddles and before the front of the loom. If one group feels looser than another, grab its knot and lift it up before re-tightening the knot to make the tension tighter. Repeat this until all of your warps feel about the same tension. Your hands will know, just trust them. I usually do this by jumping all over the bundles instead of tensioning from left to right, because tightening one loosens others and so on. Then random approach allows me to work towards more even tension a bit faster.
Before you move to the next step ensure:
- as you bounce you hand over the warp, all the groups feel about the same tension.
Weave #
Once your tensions are even, you can advance the warp (unroll the warp beam a bit, wind the cloth beam a bit), so that the apron rod sits right at the front of the loom. Use the cloth beam winding to add more or less tension across the warp. Start by weaving 1-4 rows of a really chunky material to help space out the warps. I use toilet paper. On the cricket loom, you lift up the heddle frame to select the first set of yarns (e.g. all odd heddles lifted over the evens), insert the warp, beat, and then push the heddle frame down to select the second set of yarns (e.g. all evens are lifted over the odds). This gives you a tabby structure, which is the most structured and spaced out of all the structures you can weave. The good news, this will help even out your warps!
Extra Resources: #
Common Errors and How to Address Them #
Check for some of these before you start weaving! Handy items for repairs include weights, extra string (in a contrasting color), scissors and T-pins.
Your ends are out of order (e.g. they cross paths behind the heddles) #
In the best case scenario you can untie and just swap the positions of those ends, but you may have to go back to re-threading the section where you made the error to get the order right.
Your ends are out of order (e.g. they cross paths in front of the heddles) #
A little out of orderness, within your knotted bundles will happen and is okay. It will get worked out as you weave tabby. If there is an error that involves two bundles, you should untie them and retie them so as to fix the error.
Your tensions are weird #
Untie all your bundles and retie. Cut off any weaving you have done if you have to, and then just unwind a bit of the warp so that you have extra to tie on to the front apron rod with. Maybe you have to pull one warp more than others to get it to be even. Try pulling each warp one by one to make sure it isn’t caught somewhere, before tying your bundles. Retie your groups and readjust tensions before weaving.
One or a small number of warps are really loose #
Either attach a weight (e.g. baggie of quarters, water bottle, metal washers on a string, etc.) to that warp behind the back beam and before it winds onto the warp beam. As you weave, continually update or move the weight. Alternatively, you can snip the loose end close to the fabric, pull it forward, and archor it to a T-pin inserted into the cloth.
A Warp Breaks while you are Weaving #
There are many resources available to help you online, I reccomend Peggy Osterkamp’s Repairing Broken Warp Threads: 2 Methods
If you prefer video, this video has a nice explaination.
Acknowledgements #
Thank you to Celeste Moreno for capturing and annotating the image of the warp heddles above.